Smart Home Automation System with Proximity Sensor
| ✅ Paper Type: Free Essay | ✅ Subject: Engineering |
| ✅ Wordcount: 3236 words | ✅ Published: 18 May 2020 |
- Abstract
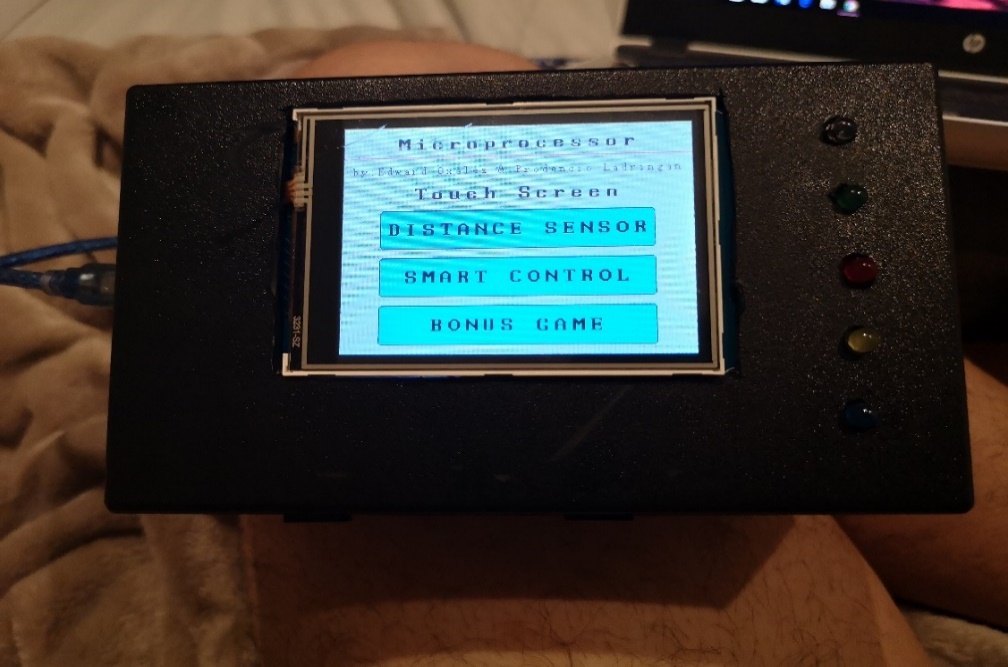
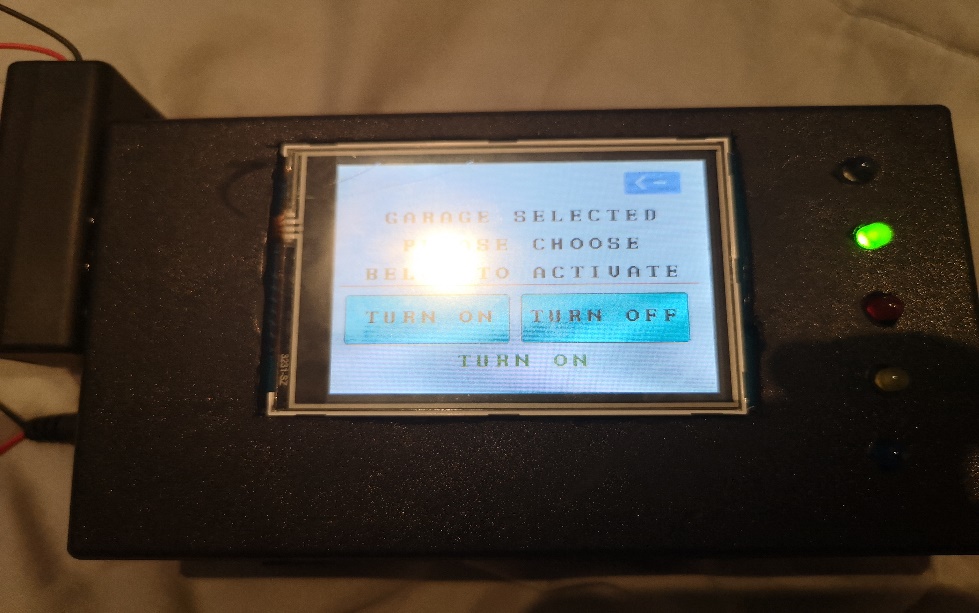
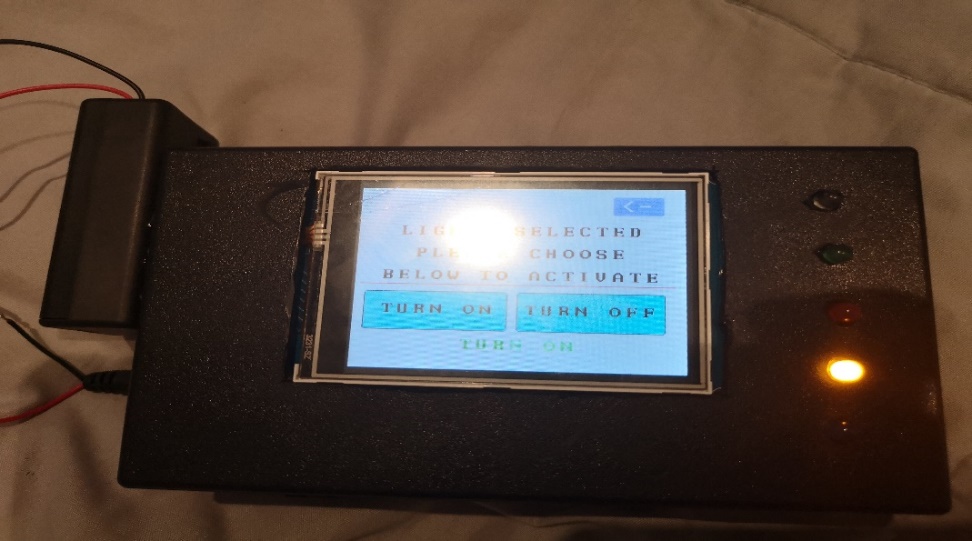
Smart home automation technology is becoming increasingly popular nowadays as it continues to develop new features that would further benefit its users. It has become a part of modernization and innovation. Interfacing it with the Arduino module along with Thin Film Transistor (TFT) touch screen seeks a convenient system and allows a user friendly device for customers. The system can be seen thru the use of TFT and can be activated or deactivated by using the touch screen interface. When the system is activated the Light Emitting Diode (LED) lights up which signifies that a certain appliances or devices are selected and is running.
This paper also illustrates a Microcontroller Interfacing using an Arduino base programming. The programs embedded on the microcontroller which includes a SMART Home System using a list of options that basically turning ON and OFF an appliance through a program that is being interfaced on a Thin Film Transistor display. With this we can activate certain appliances or equipment remotely. The second program is the Distance Measurement using an ultrasonic sensor. By utilizing an ultrasonic sensor that can measure the proximity of a certain object by using ultrasonic waves. Basically this ultrasonic sensor has a transducer that sends and receives the pulses that relay the information by frequency sound pulses that are being bounced by patterns of echo pulses. The designed techniques on both are achieved by using an Arduino Mega which will be the main components that would simulate the programs that were coded using the Arduino Sketch.
- Introduction
Over the years, smart home technology continues to provide comfortability, convenience, security and efficiency to homeowners. Monitoring and controlling of devices are made possible through the use of devices such as appliances connected to the Thin Film Transistor (TFT). Since home automation is not possible without home controllers, this urged us to develop a home control system that is inexpensive and can perform tasks efficiently. With the introduction of microcontrollers and various coding platforms we are now reaching the possibilities of remotely accessing the control devices at residential and commercial establishments via mobile applications not only nationally but globally as well. With this project, we are going to introduce microcontroller applications that can automate the home environment and an application that can measure a proximity distance.
In this paper, we utilized a thin film transistor (TFT) over other LCD Displays as this project’s touch panel. It is the most common type of colour display wherein it can be seen in televisions and digital photos. Using TFT is convenient for smart home technology users as it is known for energy efficiency. Moreover, another advantage of using TFT is its sharp visibility. This means it has a good quality physical design and increasing brightness is possible by just modifying its design. With the innovation of technologies, computer and smart applications are booming with various development in gaming, business and industrial aspects. The Smart Home Automation System basically all appliance that is integrated into the system are remotely controlled by one screen which can be set to turn ON and OFF one at a time or all at the same time. This is an option can be manipulated on one TFT screen in which was configured on Arduino Mega.
As an additional part of this project we have integrated an ultrasonic sensor that can measure a proximity distance. The Proximity distance sensor can be used for measuring the distance between the wall and the back of a vehicle. The ultrasonic sensor which uses a transducer that emits a frequency pulse and an echo pattern is being relayed in return. The measurement of proximity can be either in inches or centimeters. [1]
- Background/Related Works
Nowadays, the growth of wireless technologies signifies that there are various opportunities than to design a home automation system which controls different features, devices, and components system. Using the Touch Screen features integrated with the Arduino system, you can manipulate the use of the automation system to create a genuine smart home control. [2]
Controlling and manipulating the appliances and various features of the system by the use of microcontrollers refers to Smart home automation. A touch screen panel (TFT) is interfaced in the Arduino Mega board on which transmits the digital data commands which is display on the touch screen panel and the connected loads. The system is specified by touching the specific button which can be Turn On or Turn Off remotely by the use of the TFT Touch screen panel through wireless technology. A decoder is connected at the opposite end, which decodes the digital data transmitted and works according to the command. [3]

Presently, traditional switchboards are substituted by modern touch switches because it is safer and it is easier for the user. Also, using modern touch switches have additional advantages. There are no moving parts that are utilized in building them and they also last longer than the old ones. However, in spite of the stated advantages, there are a number of people who still prefer traditional switches because the modern ones are quite expensive. People still prefer devices which can give them the same benefits but with a lower price. This, therefore, urged me to create a Smart LCD Display Touch Switch Board that is affordable and cheaper than the ones presently sold in the markets. With the use of an android app, the switchboard can be controlled wirelessly. Moreover, the air temperature will be displayed on the screen for the user’s preference. [4]
Ultrasonic sensors have been utilized globally in various applications either indoors or outdoors even in the harshest environment. Ultrasonic sensors are made of piezoelectric crystals that have high frequency sound waves and converts the electric energy into acoustic energy, and the other way around.
Basically, there are two types of sensors, the proximity sensors which was used in this project. This type of sensors detects an object passing within the preset range, once detected it generates the output signal. The other type of sensor is the ranging measurement, it measures with precision the movement of an object towards and away from the sensor by time intervals across the transmission and bouncing pulse of the ultrasonic sound. [5]
- Proposed Project – Working Principle
As seen below is the block diagram of the proposed Smart Home Automation System with Proximity Sensor that represents the overall system operation and functionality. Utilizing an Arduino Mega 2560 microcontroller that acts as the main core of the system. The data that are integrated into the program are shown with the use of a Thin Film Transistor (TFT) and can be simulated with the use of its touch screen interface that will communicate to the microcontroller. The data can be transmitted through the touch screen module. The control and monitoring of each specific actions can be seen in the TFT touch screen. The modules on the system were established to make sure that it will transmit accurate data and no compatibility issues with the Arduino.

Figure 1: Block Diagram of the Project
Proximity measurement by ultrasonic sensors is based on the measurement of movement from one point to a reference point (Wall). The ultrasonic sensor is calculating the time between the transmitting and receiving of the bounced signal. The applications of proximity sensor can be used in the vehicle during reverse parking. It can also be used in measuring the proximity of water level in other types of application.
The sensor emits an ultrasonic sound with a frequency of 40Khz which travels over the air and if there is a wall or an object obstructing its path it will bounce back to the module. The distance can be calculated by its travel time and speed of the sound.

Figure 2: Block Diagram of the Project [6]
The HC-SR04 Ultrasonic module has 4 pins that can be identified as Ground, Trigger, Echo, and the VCC. This can be connected to a 5 volts pins of the Arduino board visa the ground and VCC inputs. The trigger and Echo can be connected to any Digital input/Output peripherals of the Arduino board. [7]
- Project Design
Below are the following components that are used in the Smart Home Control and Proximity Sensor System:
- Arduino Mega (2560) – Arduino Mega 2560 is a microcontroller board that has 54 digital I/O ports (15 of those can be used as a PWM outputs), 16 analog inputs, 4 hardware serial ports (UARTs), includes as a feature is a 16 MHz crystal oscillator, provided a USB connection for uploading the programs, supplied with a power jack, an ICSP header, also a button dedicated for resetting the whole program. It is a plug and plays microcontroller that contains every feature that is required to support the microcontroller; the connection is via a USB to a desktop computer or laptop or can be supplied with an AC-to-DC charger adapter or a 9Vdc battery to get it operated. This Arduino Mega 2560 board is compatible with most shields that are designed for Arduino Uno and the previous boards by Diecimila or Duemilanove.

Figure 2: Arduino Mega 2560 Pinout Diagram [8]

- TFT Mega Shield V2.2 – This module runs on 3.3V and is not compatible with Arduino Mega which supported a 5V interface. With this, an Arduino Mega Shield needs to be integrated into the design. With these added parts, it makes the connection more simplier and can directly assemble the TFT01 on top of the shield and on the Arduino MEGA board. Version 1.0 of the TFT MEGA shield has the capability to support both 16 bit mode. It has an SD card and Touches function features.
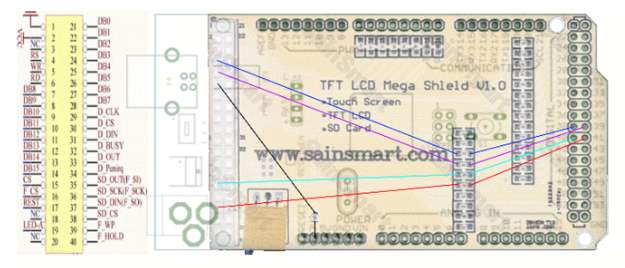
Figure 3: TFT Shield Mega Pinout
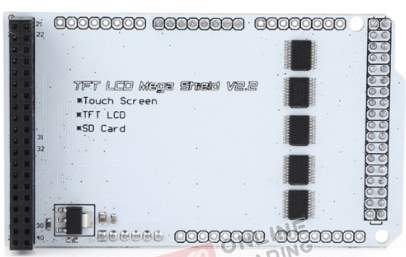
Figure 4: TFT Shield Mega V2.2 [9]
- 3.2” TFT Touch Screen (SSD1289) – this TFT LCD Screen Module, incorporates a 40pins interface, it includes a Touch screen, Flash design and SD card features. It is a massive broad module that can be utilized by programmers who are keen on doing a project based in Arduino. For accessibility purposes it has also provided with a pdf file for the SSD1289 controller. SSD1289 features can support a 16bit data interface, simpler to use and can drive by variuous microcontroller units such as AVR, 8051 and STM32.
- It has an SD card socket and serves as practical addition to TFT01. Serial Peripheral Interface which has a 40 pins interface can use the SD card as one of its features.
- External flash serves as a reserve on its additional design. It has a pad and pins out that is dedicated for the SST25VF016B flash. If the project requires, external flash can be added to its specification.
Below is the representation of a TFT01 layout with 40 pins interface that was used in the project.

Figure 5: 3.2″ TFT Touch Screen (SSD1289) Pinout Diagram

Figure 6: 3.2″ TFT Touch Screen (SSD1289)
- HC – SR04 – this type of ultrasonic proximity sensor has two transducers. The first transducer acts as a transmitter which converts the electrical signal into 40 KHz ultrasonic sound pulses. The receiver waits for the transmitted pulses. If the pulse was received, it produces an output wave where the width can be used to determine the distance the pulse travelled. The sensor is small, it is easy to use in any types of project and facilitates a magnificent non-contact range detection ranges from 2 cm to 400 cm (roughly about an inch to 13 feet) with an accuracy of 3mm. Since it operates on 5 volts, it can be connected directly to an Arduino or any other 5V logic microcontrollers.

Figure 6: HC – SR04 Pinout Diagram [10]


 The circuit diagram shows all the necessary connections to implement the Smart Home Control with Distance Parking Sensor
Figure 7: Schematic Diagram

Figure 8: Breadboard connection of components for Proximity sensors[11]

Figure 10: Bill of Materials
- Project Implementation
Arduino Integrated Development Environment (IDE) software was utilized to program both the Smart Home Automation System and the Proximity Sensor. It is a cross-platform application where the programming language is based on JAVA. We have included some of the libraries which are not available on the Arduino lists of libraries. The coding process is a tedious one since you need to accurately set or define the variables with respect to the input and output pins of the Arduino module in order the embedded codes will not fail.
To implement the project we have to utilize an Arduino Mega 2560 microcontroller to be the main core of the Smart Home Automation System with Proximity Sensor. The proximity sensor uses an HC – SR04 that measures the distance of the back of the vehicle against the wall. This ultrasonic sensor that uses a special type of ultrasonic transducers that transmits and receive the sound wave. The working principle of this proximity sensor facilitates the transducers to emit a pulse which is reflected by an obstructed wall or an object and then bounced back and receives by the sensor. The time it travels can be calculated between transmitting and receiving the pulse which is inversely proportional to the distance of the wall from the proximity sensor. The measurement is being displayed on the TFT screen for monitoring purposes. As an additional feature, a buzzer was installed to gives warning to the driver that back of the vehicle is already in the critical distance with respect to the wall. The Arduino Mega 2560 that supplied to the 5Vdc voltage for both TFT Screen and the proximity ultrasonic sensor can utilize a battery source of 9Vdc.
In reference to Figure 7, the schematic diagram of the Smart Home Automation System with proximity sensor where directly connected to the Arduino Mega 2560 module except for some external components like the buzzer, transistor, and a 1K ohm resistor was soldered to the KIWI patch.
- Challenges in Implementation
During the making and design stage of the Smart Home Automation System with Proximity Sensor at first we have a lot of apprehension on how to combine the two ideas in one project simulation and programs. But this did not hinder us to accomplish the idea in our mind into a reality. In doing this project it requires tremendous skills and knowledge on the hardware components and the codes that need to be programmed and embedded in the Arduino Mega 2560 Board. We have gathered all information related to the project specifically the required datasheets, specifications and components that needed to complete the whole project. Due to time constraints, costs, and availability of the parts, we have thoroughly reviewed the layout, inspected the wiring connections on its digital inputs and outputs peripheral pin connections and researched other factors that may contribute to wastage in resources and damages in components due to compatibility issues.
The most challenging part of the whole project making is the coding of the system. It involves a strenuous effort in testing, troubleshooting of the codes in order to get the accurate codes to run the simulation. You need to fully grasp and understands the flow of your programming codes or it will result to build failure. Though Arduino software is a free source, it lacks some of the libraries that we needed to integrate into the program we have to research the specific libraries and added it to the Arduino libraries.
We were not able to make a Proteus simulation since there are no available libraries in the for the TFT module that we have used in our project. This makes it more excruciating and makes it tedious to make a program code and you do not have an idea if the codes will run properly even it resulted in a successful build.
Procurement of parts was done outside of New Zealand, since some of the parts needed were not available so we have to outsource outside of the country and delivery time is also a great factor that we need to consider to have extra care in handling the components, connections of wiring. We cannot afford to damage the components not only because they are expensive but outsourcing and waiting time for its delivery entails a longer time to get them.
8. Limitations of the project
Below are the following constraints of Smart Home Automation with Proximity Sensor:
a) Because of the Time Constraint we were not able to make an IoT of the System.
b) The Led signifies only when the devices or system is running.
c) It requires an external component or an outsource material to be controlled.
d) The System is limited up to 5 Components or Hardware to control.
e) It uses a 9V battery, and might be discharged for a few days. However, the batteries are rechargeable and the Arduino is programmed to sleep mode to consume less power.
f) The distance measured in the Proximity sensor is limited up to 400cm.
g) The distance unit is only in centimetre and inches.
9. Conclusion
Its biggest benefits that a Smart Home Automation System with Proximity Sensor that can offer is that it brings comfort, safety and convenience at your own home. A Smart Home Automation system that includes the control in home security like CCTV and alarms. Has access to control of lighting, entertainment systems, and appliances. It may also include home security such as access control and alarm systems. You can independently control all appliances inside and outdoors by the touch of a button. Overall, this makes life easier and enjoyable at your home.
As for the proximity sensor though its application is to detect and gives the warning when you are parking your vehicle at your own garage. But its application can be improved and can be utilized in other aspects that benefit the user.
10. References
|
[1] |
R. Santos, “random nerd tutorials,” 2013. [Online]. Available: https://randomnerdtutorials.com/complete-guide-for-ultrasonic-sensor-hc-sr04/. [Accessed 8 August 2019]. |
|
[2] |
B. Turner, “https://www.techradar.com,” 13 May 2019. [Online]. Available: https://www.techradar.com/au/best/best-home-automation-systems. [Accessed 8 August 2019]. |
|
[3] |
D. Singh, “https://www.instructables.com,” 8 June 2015. [Online]. Available: https://www.instructables.com/id/TOUCH-SCREEN-BASED-HOME-AUTOMATION-SYSTEM/. [Accessed 8 August 2019]. |
|
[4] |
Electronicsforu, “https://electronicsforu.com,” 15 April 2019. [Online]. Available: https://electronicsforu.com/electronics-projects/smart-arduino-touch-switch-board. [Accessed 9 August 2019]. |
|
[5] |
TURNKEY DIGITAL, “Migraton Corp.,” 2015. [Online]. Available: https://www.migatron.com/ultrasonic-detections-and-control-applications/. [Accessed 12 August 2019]. |
|
[6] |
R. Burnett, “MaxBotix,” 17 July 2019. [Online]. Available: https://www.maxbotix.com/articles/how-ultrasonic-sensors-work.htm. [Accessed 15 August 2019]. |
|
[7] |
D. Nedelkovski, “How To Mechatronics,” 27 July 2015. [Online]. Available: https://howtomechatronics.com/tutorials/arduino/ultrasonic-sensor-hc-sr04/. [Accessed 15 August 2019]. |
|
[8] |
Arduino, “https://store.arduino.cc,” [Online]. Available: https://store.arduino.cc/usa/mega-2560-r3. [Accessed 13 August 2019]. |
|
[9] |
Elecfreaks, “https://www.elecfreaks.com,” [Online]. Available: https://www.elecfreaks.com/estore/lcd-tft01-arduino-mega-shield-v2-0-shd10.html. [Accessed 13 August 2019]. |
|
[10] |
Lastminuteengineers, “https://lastminuteengineers.com,” [Online]. Available: https://lastminuteengineers.com/arduino-sr04-ultrasonic-sensor-tutorial/. [Accessed 15 August 2019]. |
|
[11] |
circuito.io, “circuito.io,” [Online]. Available: https://www.circuito.io/app?components=512,11061,13959,956215. [Accessed 12 August 2019]. |
11. Appendix


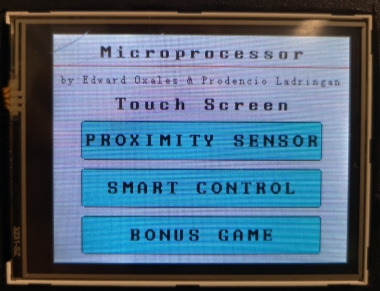
Smart Home Automation System display features

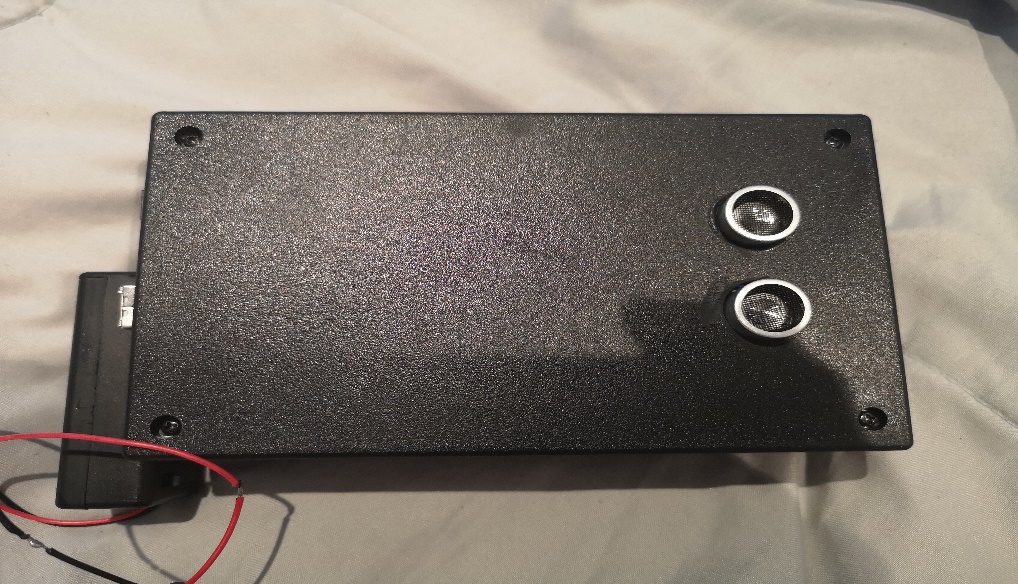


Proximity Sensor display and measurement features


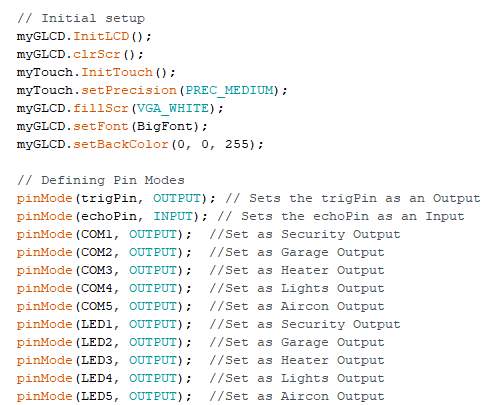
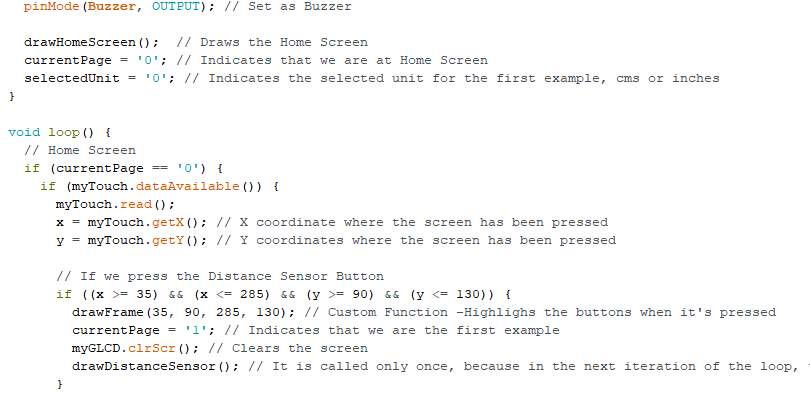
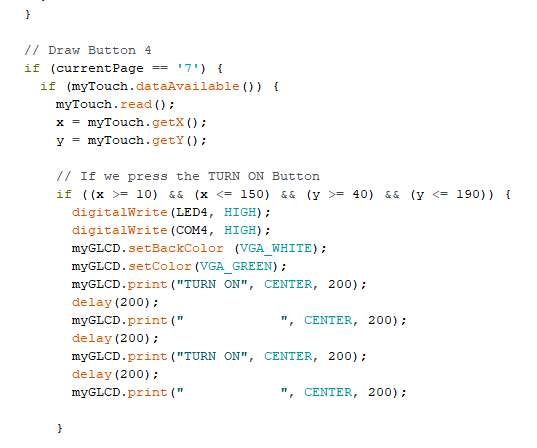
12. Codes


13. Added features as future implementation on the project
Future features of the project using IoT


Cite This Work
To export a reference to this article please select a referencing stye below:
Related Services
View all


DMCA / Removal Request
If you are the original writer of this essay and no longer wish to have your work published on UKEssays.com then please click the following link to email our support team:
Request essay removal